Played with some word art.....would love to see how you use it
Get it - HERE

Gail


Scrapkit - Sweet Dreams - HERE
Template - temp117 - HERE
Mask - HERE #903
Tube - A.Vanhek - HERE
***Disclaimer***
This tutorial is of my own creation. I am using PSP2019. Please leave a thanks when downloading. If I am using a template, I always start at the bottom and work my way up. If using a FTU or PTU tube - please don't use without proper copyright. Always drop shadow as you go. If you try one of my tuts, I would love to display it on my blog....thanks
~~~~~~~~~~~~~~~~~~~~~~~~~~~~~~~~~~~~~~~~~~~~~~~~~~~~~~~~~
Open template and delete copyright layer
Image/canvas size/800x800
Click bottom
P5 - apply mask/merge group
Frame fill - p18
Position closeup
Frame layer 4- p15
Frame layer 2 - p7
Strip - flood fill and add an inner bevel
E91 - colorize
E95 - resize 65%
E61 - resize 45%
For the rest of template layers - add your own flowers
Swirl leaf - E29
E92
Cluster1 - erase frame - resize 45%
Position tube
Sweetheart frame4 - I added an inner bevel
Merge visible/crop/resize as needed/add proper copyright
Wally


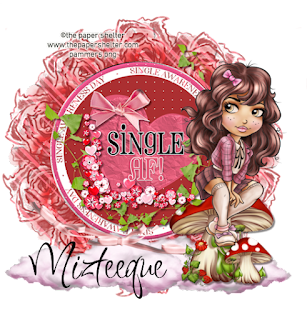
Scrapkit - Heaven Sent by MizT - HERE
Template - HERE #4
Mask - last mask - HERE
Tube - The Paper Shelter - HERE
***Disclaimer***
This tutorial is of my own creation. I am using PSP2019. Please leave a thanks when downloading. If I am using a template, I always start at the bottom and work my way up. If using a FTU or PTU tube - please don't use without proper copyright. Always drop shadow as you go. If you try one of my tuts, I would love to display it on my blog....thanks
Open template, delete copyright layer and ribbon layers
P15 - apply mask/merge group
E26 - resize 50%
Mura meister/copies/encircle/default
Move below mask layer
Black circle - p10
Dark pink circle - p14
Pink circle - p13
Large heart - select/float
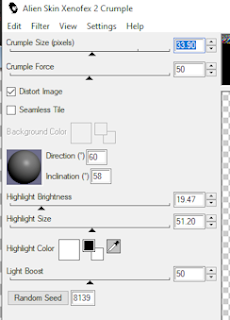
Alien SkinXenofex - crumple
Merge visible/crop/resize as needed/add proper copyright
Wally


Scrapkit - My Valentine - HERE
Template - HERE #2
Mask - HERE #5
Tube - Pinuptoons at CDO - HERE
***Disclaimer***
This tutorial is of my own creation. I am using PSP2019. Please leave a thanks when downloading. If I am using a template, I always start at the bottom and work my way up. If using a FTU or PTU tube - please don't use without proper copyright. Always drop shadow as you go. If you try one of my tuts, I would love to display it on my blog....thanks
--------------------------------------------------------------------------------
Open template and delete copyright layer
P5 - apply mask/merge group
2 black dotted rectangles - flood fill with dark red
2 pink rectangles - p8
dark pink rectangle - p2
black rectangle - p18
light pink circle - p5
E99
E102 - resize 65%
E91
E115
Position tubes
2 dark pink squares - p11
E103 - resize 85%
E1 - resize 50%
Merge visible/crop/resize as needed/add proper copyright

Scrapkit - Magic - HERE
Template - by Millie - HERE
Mask - Your choice
Tube - Anna Liwanag - HERE
***Disclaimer***
This tutorial is of my own creation. I am using PSP2019. Please leave a thanks when downloading. If I am using a template, I always start at the bottom and work my way up. If using a FTU or PTU tube - please don't use without proper copyright. Always drop shadow as you go. If you try one of my tuts, I would love to display it on my blog....thanks
~~~~~~~~~~~~~~~~~~~~~~~~~~~~~~~~~~~~~~~~~
Open template/delete copyright and word art
Click bottom layer
P9 -apply mask/merge group
1 - p4
2 - flood fill color of choice
Add noise
3&4 - p6
5-8 - p5
E37 - resize 120%
E30
E34
9 - E15
10 - click inside with magic wand - E15
Effects - artistic/halftone/default
E43
Duplicate/image/mirror/flip
E53 - resize 75%
E13
E32
E12
E28 - resize 75%
I added these elements according to my tube
E18 - resize 75%
E16 - resize 50%
Add tube
Merge visible/crop/resize as needed/add proper copyright
Sandy


Scrapkit - Silent Night by Crys - HERE
Mask - lbm06 - HERE
Tube - OllyOwl (chatter tube at EFR - HERE)
***Disclaimer***
This tutorial is of my own creation. I am using PSP2019. Please leave a thanks when downloading. If I am using a template, I always start at the bottom and work my way up. If using a FTU or PTU tube - please don't use without proper copyright. Always drop shadow as you go. If you try one of my tuts, I would love to display it on my blog....thanks
~~~~~~~~~~~~~~~~~~~~~~~~~~~~~~~~~~~~~~~
P4 - apply mask/merge group
Frame2 - resize 75%
Grab magic wand and click inside frame/modify/expand by 5/p9/invert/delete/select none
Move p9 down under frame
Position tube
E16
E31
E11 - mirror
E26 - resize 60%
E34 and 35 - resize 40%
E36 - resize 30%
E10
E7 - resize 40%
E1 - resize 30%
E28
E22 - resize 30%
E3 - resize 40%
E4 - resize 35%
E29 - resize 35% - position at feet of penguin
Duplicate/mirror
Merge visible/crop/resize as needed/add proper copyright
Sandy


Scrapkit - Lavendar Winter - HERE
Mask - HERE
Tube - AVH with PFD - HERE
***Disclaimer***
This tutorial is of my own creation. I am using PSP2019. Please leave a thanks when downloading. If I am using a template, I always start at the bottom and work my way up. If using a FTU or PTU tube - please don't use without proper copyright. Always drop shadow as you go. If you try one of my tuts, I would love to display it on my blog....thanks
~~~~~~~~~~~~~~~~~~~~~~~~~~~~~~~~~~~~~~~~~~~~~
P33 - apply mask/merge group
E124 - resize 85%
Mura meister/copies/encircle/12,70,70
E114 - erase trunk
Duplicate/image/mirror
E1 - resize 70%
E9
E83
E81
Position tube
E47 - resize 70%
E105 - Resize 50%
E121 - resize 85% and erase stem
E102 - resize 80%
E8 - resize 35%
Merge visible/crop/resize as needed/add proper copyright
Wally

